
Are you ready to impress your brunch guests? These Herb and Cheese Scones are easy to make and bursting with flavor! With just a handful of simple ingredients like sharp cheddar and fresh herbs, you can create the perfect treat for your next gathering. Follow my step-by-step guide, and I’ll show you how to bake up fluffy, golden scones that will make everyone ask for seconds. Let’s dive into this delicious adventure!
Ingredients
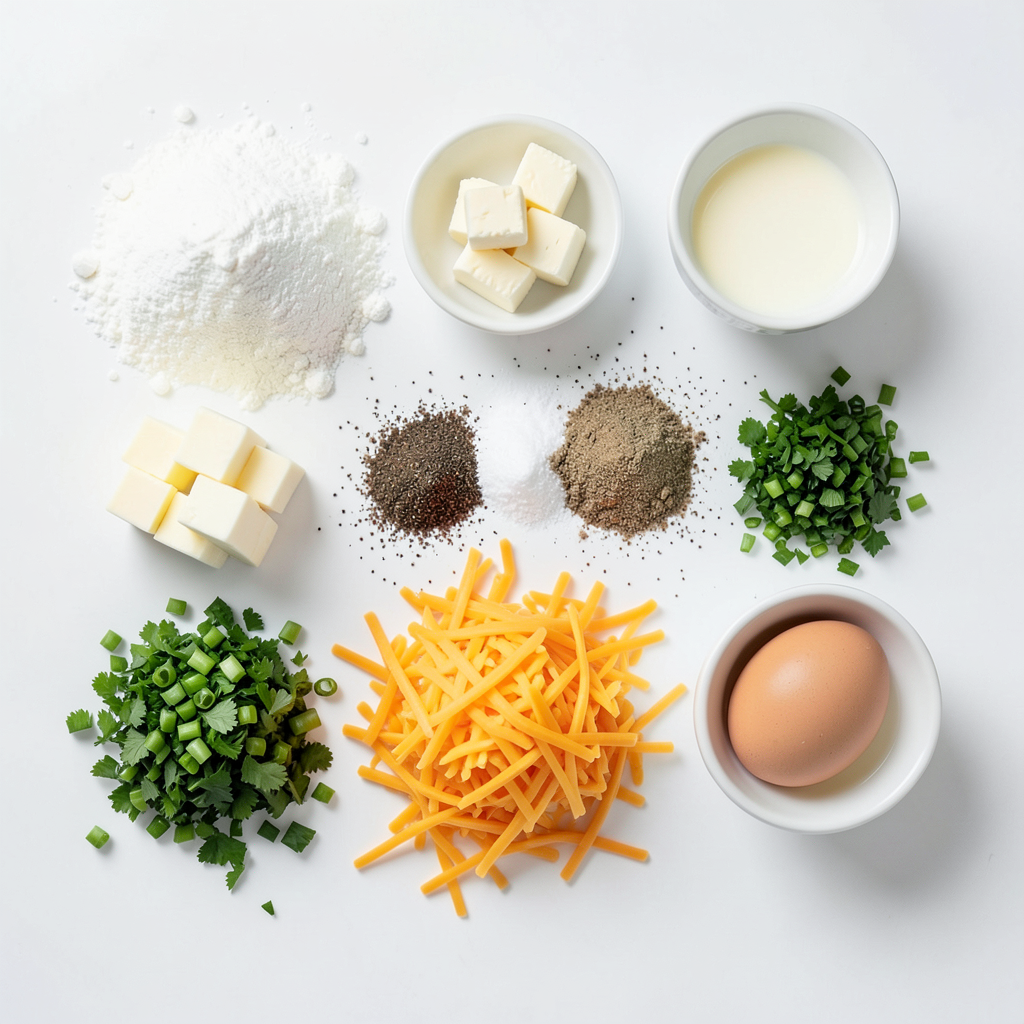
List of Required Ingredients
- Dry Ingredients:
- 2 cups all-purpose flour
- 1 tablespoon baking powder
- 1/2 teaspoon salt
- 1/4 teaspoon black pepper
- 1/2 teaspoon garlic powder
- Wet Ingredients:
- 3/4 cup buttermilk
- 1 egg (for egg wash)
- Fat and Cheese:
- 1/4 cup cold unsalted butter, cubed
- 1 cup shredded sharp cheddar cheese
- Fresh Herbs:
- 1/4 cup fresh chives, chopped
- 1/4 cup fresh parsley, chopped
These ingredients create a strong base for the scones, giving them a savory kick. The flour and baking powder make them light and fluffy. Salt, black pepper, and garlic powder add flavor. Cold butter creates a tender texture. Sharp cheddar cheese brings richness. Fresh chives and parsley give a burst of color and taste. Using buttermilk helps bind everything together while adding moisture. Finally, the egg wash makes the tops golden and shiny. Each ingredient plays a vital role, so choose the best quality for the best results.
Step-by-Step Instructions
Preparation Steps
1. Preheat the oven to 425°F (220°C). Line a baking sheet with parchment paper. This helps prevent sticking and makes cleanup easy.
2. In a large bowl, whisk together 2 cups of flour, 1 tablespoon of baking powder, 1/2 teaspoon of salt, 1/4 teaspoon of black pepper, and 1/2 teaspoon of garlic powder. This mix gives the scones a nice base and flavor.
3. Add 1/4 cup of cold cubed unsalted butter to the dry mix. Use your fingers or a pastry cutter to combine. You want it to look like coarse crumbs.
4. Stir in 1 cup of shredded sharp cheddar cheese, 1/4 cup of chopped fresh chives, and 1/4 cup of chopped fresh parsley until everything is mixed well. The cheese and herbs add great taste to the scones.
Assembling the Dough
1. Make a well in the center of the mixture. Pour in 3/4 cup of buttermilk. Slowly mix with a spatula. Stop when the dough just comes together. Avoid overmixing to keep the scones light.
2. Turn the dough onto a floured surface. Gently knead it a few times until it holds together. Pat the dough into a circle about 1 inch thick.
Cutting and Baking
1. Use a sharp knife or pizza cutter to slice the dough into 8 wedges, similar to cutting a pizza. This helps with even baking.
2. Arrange the wedges on the prepared baking sheet, leaving space between them. This allows the scones to rise and bake evenly.
3. Brush the tops of the scones with a beaten egg. This gives them a lovely golden finish when baked.
4. Place the baking sheet in the oven and bake for 15-20 minutes. They are done when they are golden brown and cooked through.
5. After baking, remove the scones from the oven and let them cool slightly on a wire rack. Enjoy them warm!
Tips & Tricks
Baking Tips
Achieving the perfect texture in scones is key. Use cold butter to keep the dough flaky. Mix it in until it looks like coarse crumbs. This step helps create layers. Don't overmix the dough; just combine the buttermilk until it comes together.
For the egg wash, use a pastry brush. Apply a thin layer over the tops of the scones. This will give them a nice golden color when baked. Be gentle; you want to avoid deflating the dough.
Serving Suggestions
Pair your scones with toppings like honey butter or your favorite jam. Honey butter adds a sweet touch that contrasts well with the savory cheese. Jam brings a fruity flavor that complements the herbs.
For plating, serve the scones warm on a rustic wooden board. Add some extra fresh herbs for a pop of color. Arrange the scones in a circle and place toppings in small bowls nearby. This setup invites guests to enjoy a fun brunch experience.
Variations
Flavor Variations
You can change the flavors in your scones easily. Using different types of cheese can add a new twist. Try feta for a tangy taste or gouda for a rich, creamy flavor. Mixing in other herbs also makes a big difference. You can use basil for a sweet touch or dill for a fresh, bright flavor. These small changes can make your scones unique and delicious.
Dietary Adjustments
If you need gluten-free options, use a gluten-free flour blend. Just ensure the blend includes a binding agent like xanthan gum. For a vegan version, swap the buttermilk with plant milk and add a splash of vinegar. Use a vegan butter substitute in place of the cold unsalted butter. These adjustments allow everyone to enjoy these tasty scones.
Storage Info
Storing Leftovers
To keep your scones fresh, store them in an airtight container. This helps prevent them from drying out. Place a piece of parchment paper between layers if you stack them. It keeps them from sticking together. Refrigerate the scones if you plan to eat them within a few days. They will stay good for about three days in the fridge. For longer storage, consider freezing them. Just make sure they cool completely before you freeze them.
Reheating Instructions
To enjoy your scones warm again, preheat your oven to 350°F (175°C). Place the scones on a baking sheet and cover them loosely with foil. This keeps them moist. Heat for about 10-15 minutes until warm. You can also use a microwave, but be careful not to overheat. Heat them for about 20-30 seconds. Enjoy them with a touch of butter or your favorite spread for a tasty treat.
FAQs
Can I freeze these scones?
Yes, you can freeze these scones. After baking, let them cool completely. Wrap each scone tightly in plastic wrap. Then place them in a freezer bag or container. They can last up to three months. When you want to enjoy them, simply thaw and reheat in the oven.
How to know when scones are done baking?
Scones are done when they are golden brown on top. You can also check by tapping the bottom. If it sounds hollow, they are ready. A toothpick inserted in the center should come out clean. Keep an eye on them to avoid overbaking.
Can I make the dough ahead of time?
You can make the dough ahead of time. Prepare the dough, but do not bake it. Wrap it tightly in plastic wrap and store it in the fridge for up to 24 hours. When ready, cut and bake as directed. This saves time when you want a quick brunch.
What to serve with herb and cheese scones?
These scones pair well with many tasty items. Try serving them warm with whipped honey butter. Jams like strawberry or raspberry also work great. For a savory touch, serve with cream cheese or herbed spread. Fresh fruit and a light salad can complete your brunch spread.
In this article, we covered how to make delicious herb and cheese scones. You learned about the ingredients needed and followed easy steps for preparation, assembling the dough, and baking. We also discussed tips for perfect texture and creative ways to serve.
Now, you can customize your scones and store any leftovers easily. Whether you enjoy them for brunch or a snack, these tips will help you make the best scones every time. Enjoy baking!