
Are you ready to impress your friends at brunch? The Brunch Creamy Artichoke and Herb Tart Delight is your secret weapon. This dish blends rich flavors and fresh herbs, creating a dish everyone will love. Plus, it’s easy to make, ensuring you spend more time enjoying and less time cooking. Let’s dive into the ingredients, step-by-step instructions, and tips to make the perfect tart. Get ready to serve something extraordinary!
Ingredients
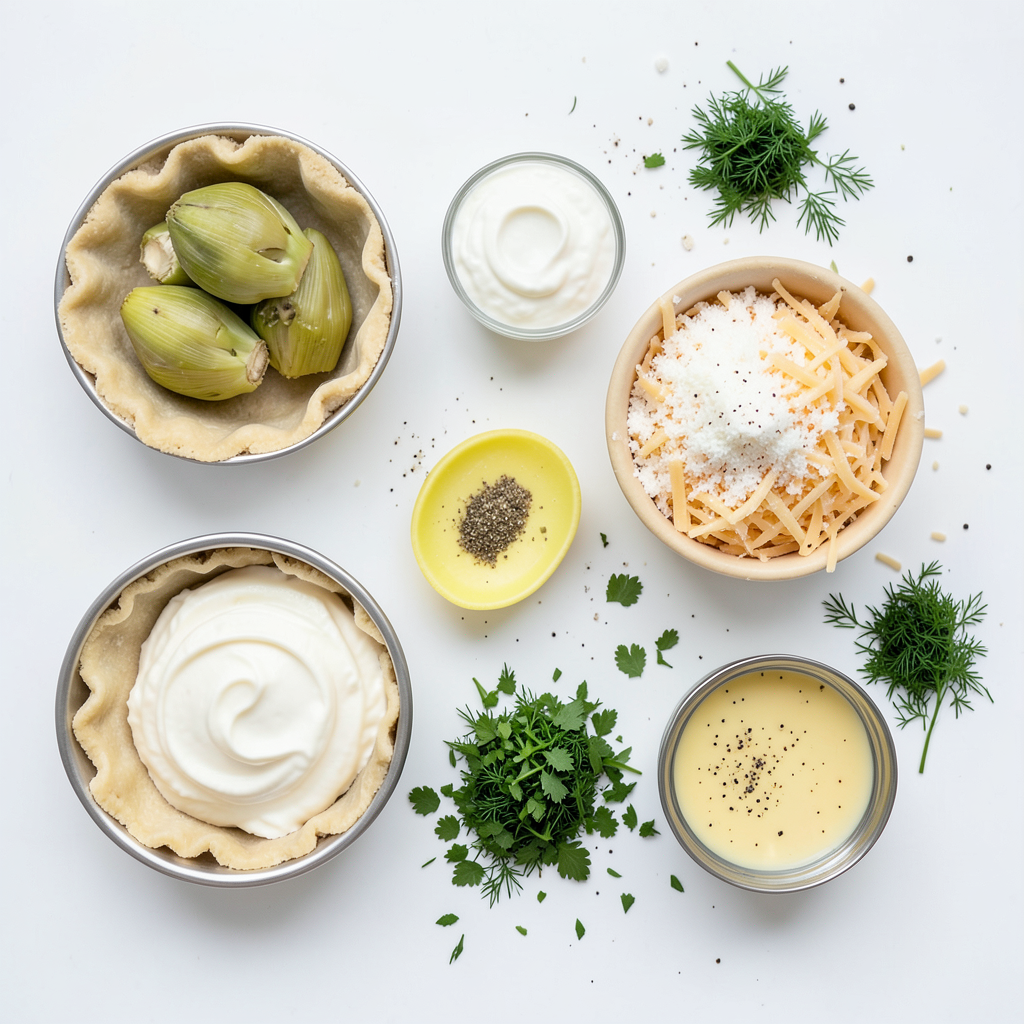
List of Ingredients
To make the Brunch Creamy Artichoke and Herb Tart, gather these ingredients:
- 1 pre-made pie crust (store-bought or homemade)
- 1 can (14 oz) artichoke hearts, drained and chopped
- 1 cup cream cheese, softened
- 1/2 cup sour cream
- 1/2 cup shredded mozzarella cheese
- 2 tablespoons grated Parmesan cheese
- 2 cloves garlic, minced
- 1 tablespoon fresh lemon juice
- 1 tablespoon fresh dill, chopped
- 1 tablespoon fresh parsley, chopped
- Salt and pepper to taste
- 1 egg, beaten (for egg wash)
Substitutions for Key Ingredients
If you do not have some ingredients, here are easy swaps:
- Pie crust: You can use puff pastry instead.
- Cream cheese: Try ricotta or goat cheese for a different taste.
- Sour cream: Greek yogurt is a great alternative.
- Mozzarella cheese: Cheddar or gouda can add a new flavor.
- Herbs: Use any fresh herbs you have, like basil or chives.
Nutritional Information Overview
This tart serves about 8 people. Here is a quick look at its nutrition:
- Calories: Approximately 300 per slice
- Protein: 8 grams
- Fat: 22 grams
- Carbohydrates: 18 grams
- Fiber: 1 gram
- Sodium: 350 mg
This tart is a creamy delight packed with flavor. Each bite gives you a blend of rich artichokes and fresh herbs. Enjoy this dish as a special treat for brunch or any gathering!
Step-by-Step Instructions
Preparation of Tart Crust
First, preheat your oven to 375°F (190°C). This step is key for a nice, flaky crust. Next, take your pre-made pie crust. Roll it out gently. Fit it into a 9-inch tart pan. Press the crust into the bottom and sides. Don’t forget to trim any excess crust. This ensures an even bake and a neat look.
Making the Creamy Artichoke Filling
In a large mixing bowl, combine your softened cream cheese, sour cream, and shredded mozzarella cheese. Mix them well until smooth. Now, add in the chopped artichoke hearts. Don’t skip the minced garlic; it adds great flavor. Pour in the fresh lemon juice and toss in the dill and parsley. Season with salt and pepper to taste. Stir until everything is well blended. This mixture will be creamy and full of flavor.
Baking and Serving Suggestions
Spoon the artichoke filling into the tart crust. Spread it evenly for a nice finish. Sprinkle grated Parmesan cheese on top. This gives a rich taste and a lovely crust. Brush the tart edges with the beaten egg. This makes them golden when baked. Place the tart in the preheated oven. Bake it for about 30 to 35 minutes. You’ll know it’s done when the filling is bubbly and the crust is lightly golden. After baking, let it cool for 5 to 10 minutes. Serve the tart warm or at room temperature. For a pop of color, garnish it with fresh herbs and a lemon wedge.
Tips & Tricks
Common Mistakes to Avoid
When making your tart, avoid using cold cream cheese. It needs to be soft for easy mixing. If you forget to soften it, pop it in the microwave for a few seconds. Another mistake is overfilling the tart crust. Leave some space at the top; the filling will puff up slightly when baked. Lastly, don’t skip the egg wash. It makes the crust golden and gives it a nice shine.
Best Practices for Serving
Serve the tart warm or at room temperature. This helps the flavors shine through. I like to garnish with fresh herbs and a lemon wedge. This adds color and freshness. Cut the tart into even slices for a neat presentation. You can serve it on a nice platter for a lovely brunch display.
How to Enhance Flavor Profiles
To boost the flavor, consider adding more herbs. Fresh thyme or chives can add depth. A pinch of red pepper flakes gives a nice kick. For a richer taste, try using a blend of cheeses, like goat cheese with mozzarella. Lastly, a drizzle of olive oil right before serving can elevate the dish.
Variations
Vegetarian and Vegan Alternatives
You can make this tart vegetarian easily. Use a plant-based cream cheese instead of regular cream cheese. Swap sour cream with a vegan sour cream. For the egg wash, brush with almond milk or plant-based butter. These swaps keep the tart creamy and delicious without any animal products.
Cheese Variations for Different Flavors
Cheese can change the taste of your tart. Try adding goat cheese for a tangy twist. For a sharper flavor, use cheddar cheese instead of mozzarella. Mixing different cheeses can also create a unique taste. Blend in some feta for a Mediterranean touch or add smoked cheese for depth.
Seasonal Ingredient Substitutions
Embrace seasonal ingredients to keep things fresh. In spring, add fresh asparagus or peas for a pop of green. In summer, fresh tomatoes and basil bring a bright flavor. In fall, use roasted butternut squash or sweet potatoes for a cozy vibe. Winter calls for hearty greens like kale or spinach to warm you up.
Storage Info
How to Store Leftovers
To store your leftover tart, let it cool first. Cover it tightly with plastic wrap. You can also use an airtight container. Place it in the fridge. It will stay fresh for up to three days. Keep the tart away from strong-smelling foods. This helps to keep its flavor intact.
Reheating Instructions
When you're ready to enjoy the tart again, preheat your oven to 350°F (175°C). Place the tart on a baking sheet. Cover it with foil to prevent over-browning. Heat it for about 15-20 minutes. Check that the filling is hot. You can also use a microwave. Heat slices for about 1-2 minutes. The texture may not be the same, but it will still taste great.
Freezing Options for Future Use
You can freeze the tart for later. First, let it cool completely. Wrap it tightly in plastic wrap. Then wrap it in aluminum foil. This gives extra protection. Label it with the date. It can stay in the freezer for up to three months. To reheat, thaw it in the fridge overnight. Then, bake it at 350°F (175°C) until hot. This way, you can enjoy a tasty meal anytime.
FAQs
Can I Make This Tart Ahead of Time?
Yes, you can make this tart ahead of time. Prepare the tart up to the baking step. Cover it well and store it in the fridge. You can bake it later, just remember to add a few extra minutes to the baking time.
What Can I Serve with Artichoke and Herb Tart?
You can serve this tart with a fresh salad. A light green salad pairs well. You can also add some sliced tomatoes or cucumbers for color. A bowl of mixed fruit can make a nice side, too. If you want, serve it with a dipping sauce or a drizzle of balsamic glaze.
How to Tell When the Tart is Done Baking?
The tart is done when the filling bubbles. The crust should be lightly golden. You can insert a knife in the center; it should come out hot. Let it cool for a few minutes before slicing. This helps the filling set for easier serving.
This blog post gave you a clear guide to making a delicious artichoke and herb tart. You learned about the key ingredients, substitutions, and nutritional facts. I shared easy steps to prepare the crust and filling, plus tips for baking and serving. You also discovered variations for different diets and how to store and reheat leftovers.
In the end, this tart is a simple and tasty dish. You can impress guests or enjoy it yourself. Happy cooking!