
Are you tired of rushed mornings with no time for breakfast? I’ve got just the solution! These Make-ahead Breakfast Veggie Quiche Cups let you enjoy tasty, healthy meals without stress. Packed with veggies, cheese, and flavor, they’re perfect for meal prep. Get ready to easily whip up a batch and fuel your day right. Let’s dive into the ingredients and get cooking!
Ingredients
Main Ingredients for Veggie Quiche Cups
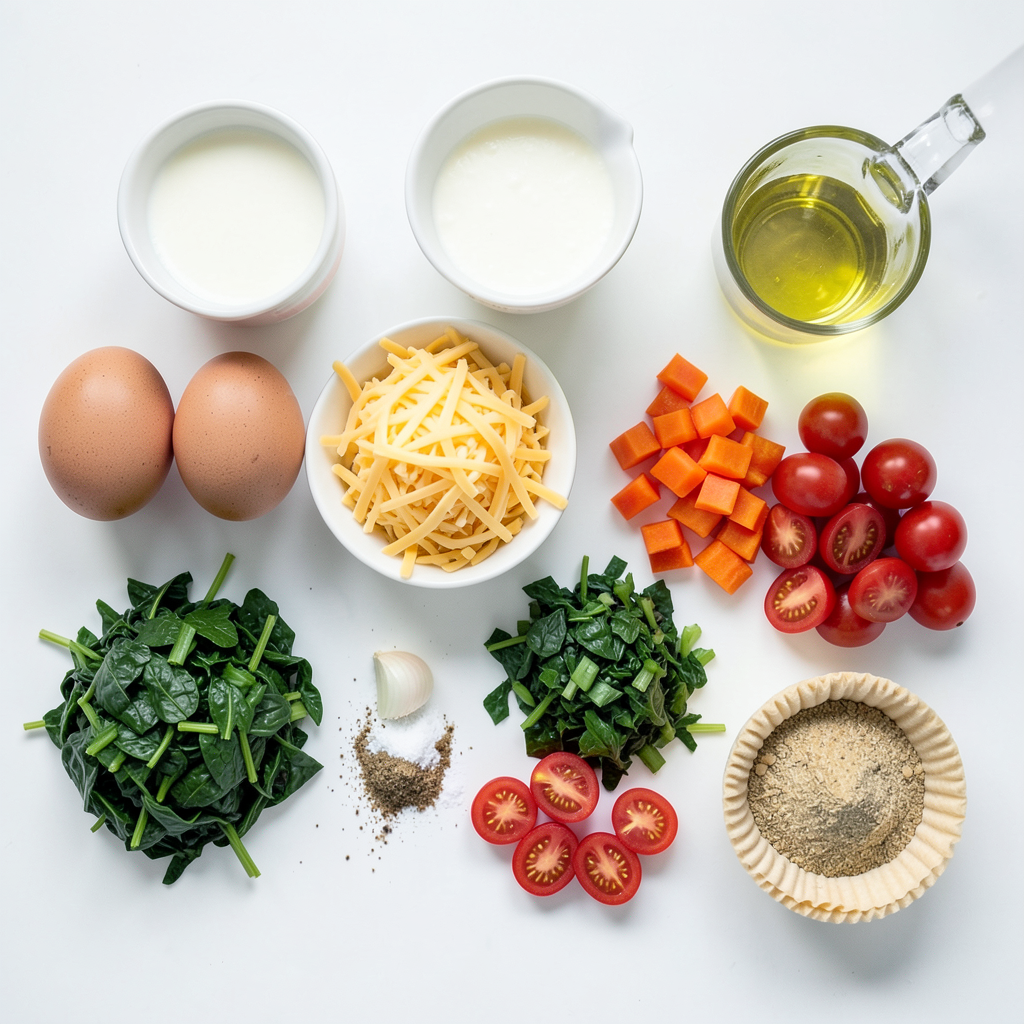
To make these tasty veggie quiche cups, gather these items:
- 6 large eggs
- 1 cup milk
- 1 cup shredded cheese (cheddar or your favorite blend)
- 1 cup spinach, chopped
- 1/2 cup bell peppers, diced (red and green for color)
- 1/2 cup cherry tomatoes, halved
- 1 small onion, finely chopped
- 1/2 teaspoon garlic powder
- Salt and pepper to taste
- 1 teaspoon olive oil
- 1 package of pre-made phyllo pastry cups or mini pie crusts
These ingredients create a delicious base for your quiche cups. The eggs and milk form a rich custard, while the veggies add color and nutrition.
Substitutions for Vegetables
Feel free to switch out the vegetables based on your taste or what's in your fridge. Here are some ideas:
- Swap spinach for kale or arugula.
- Use zucchini or mushrooms instead of bell peppers.
- Try adding corn or broccoli for a different flavor.
- You can even use frozen veggies if that's what you have.
These swaps allow you to customize your quiche cups to your liking. Experiment until you find your favorite mix!
Cheese Options to Enhance Flavor
Cheese adds a creamy texture and depth of flavor. Here are some great choices:
- Feta cheese gives a tangy kick.
- Mozzarella adds a mild, gooey texture.
- Goat cheese brings a rich and earthy taste.
Mix and match these cheeses for fun flavor blends. You can also try adding herbs like thyme or basil to enhance the taste even more. Enjoy creating your perfect veggie quiche cups!
Step-by-Step Instructions
Preheating and Sautéing the Vegetables
First, preheat your oven to 375°F (190°C). This sets the stage for baking. While the oven warms up, grab a skillet and add 1 teaspoon of olive oil. Heat it over medium heat. Once hot, toss in the finely chopped onion. Sauté it for 3 to 4 minutes until it turns soft and clear.
Next, add the diced bell peppers and chopped spinach. Cook these for another 3 minutes. Stir often until the spinach wilts. Once done, take the skillet off the heat and let the mix cool a bit.
Preparing the Egg Mixture
In a large mixing bowl, crack 6 large eggs. Pour in 1 cup of milk. Sprinkle in 1/2 teaspoon garlic powder, then add salt and pepper to your taste. Whisk this mix well until it’s smooth. Now, stir in the sautéed veggies and 1 cup of shredded cheese. Make sure everything is well combined.
Filling the Cups and Baking Instructions
Grab your package of phyllo pastry cups or mini pie crusts. Place these on a baking sheet for easy handling. Carefully fill each cup with the egg mixture. Fill them about 3/4 full to leave room for rising.
Now, halve the cherry tomatoes and place them on top of the egg mixture in each cup. Once all cups are filled, put the baking sheet in the preheated oven. Bake for 20 to 25 minutes. You know they are done when the eggs are set and the tops are lightly golden.
Let the quiche cups cool for a bit before taking them out of the pan. Enjoy your delicious make-ahead breakfast!
Tips & Tricks
How to Ensure Perfectly Set Eggs
To get eggs just right, focus on temperature. First, preheat your oven to 375°F (190°C). This helps the eggs cook evenly. When mixing, beat the eggs well with milk. This adds air and makes them fluffy. Fill each cup about 3/4 full. This gives enough room for the eggs to rise. Bake until the tops are golden, about 20-25 minutes. Check that the center is firm. If it jiggles, give it a few more minutes.
Adding Extra Flavor with Herbs and Spices
Herbs and spices can boost the taste of your quiche cups. I like to add garlic powder for warmth. Fresh herbs like parsley or chives brighten the dish. You can also try basil or thyme for a different twist. Mix these into the egg mixture before you fill the cups. A pinch of red pepper flakes adds a nice kick, too. Don’t be shy; use your favorite flavors!
Presentation Tips for Serving Quiche Cups
Making your quiche cups look great is easy. Arrange them on a large platter for a colorful display. Garnish with fresh herbs on top to add a pop of green. You can also serve them with a side of mixed greens. This not only looks nice but adds freshness. Use small plates or napkins for easy serving. Your guests will love the taste and the look!
Variations
Gluten-free Options
You can make these veggie quiche cups gluten-free easily. Instead of using phyllo pastry cups or mini pie crusts, use gluten-free pastry shells. You can also make a crustless version. Simply grease a muffin tin and pour the egg mixture directly into it. This way, you get all the flavors without the gluten.
Protein Add-ins for Heartier Quiche Cups
Want to add some protein? You can mix in cooked bacon, sausage, or even diced ham. These meats add great flavor. If you prefer plant-based options, try adding black beans or tofu. They boost protein without meat. Just make sure to adjust the seasoning to match your add-ins.
Seasonal Vegetable Suggestions
Seasonal veggies make these quiche cups even better. In spring, add asparagus and fresh peas. In summer, try zucchini and corn. Fall brings great flavors from mushrooms and butternut squash. In winter, consider using root vegetables, like sweet potatoes or carrots. Each season offers unique tastes to keep your quiche cups exciting.
Storage Info
Best Way to Store Quiche Cups
To keep your quiche cups fresh, place them in an airtight container. This will prevent them from drying out. You can store them in the fridge for up to four days. If you want to keep them longer, consider freezing them. Wrap each cup in plastic wrap, then place them in a freezer-safe bag. They will stay good for up to three months.
Reheating Instructions for Optimal Taste
When you are ready to enjoy your quiche cups, reheating them correctly is key. Preheat your oven to 350°F (175°C). Place the cups on a baking sheet and cover them with foil. Heat for about 10-15 minutes until warm. You can also use a microwave. Heat each cup for 30-60 seconds on high, checking to avoid overcooking.
Meal Prep Tips for Easy Breakfasts
Meal prep makes mornings easier. To prepare ahead, make your quiche cups on the weekend. Once they cool, store them as mentioned above. You can grab one or two each morning. Pair them with fruit or yogurt for a complete meal. This ensures you start your day off right with a healthy, tasty breakfast!
FAQs
Can I freeze make-ahead veggie quiche cups?
Yes, you can freeze these quiche cups. After baking and cooling, place them in airtight containers. You can also use freezer bags. They will stay fresh for up to three months. When you want to eat them, just thaw them in the fridge overnight. Then, heat them in the oven or microwave. This way, you have a quick meal ready to go!
How long do quiche cups last in the fridge?
Quiche cups last for about four to five days in the fridge. Make sure to store them in a sealed container. This helps keep them fresh and tasty. If you notice any changes in smell or texture, it's best to toss them. Enjoy them warm or cold, as they taste great either way!
Are these quiche cups suitable for meal prep?
Absolutely! These quiche cups are perfect for meal prep. They are easy to make ahead and pack well. You can make a batch on the weekend and grab them for breakfast during the week. This way, you save time and enjoy a healthy meal every morning. Plus, you can customize them with your favorite veggies and cheese!
In this article, we explored how to make tasty veggie quiche cups. We covered main ingredients, step-by-step instructions, and useful tips for perfect results. You learned about substitutions and variations to suit your taste. Proper storage and reheating methods ensure your quiche cups stay fresh.
Creating your own healthy quiche cups can be fun and rewarding. Experiment with flavors to find your favorite mix. With practice, these dishes can become a staple in your meal prep routine. Enjoy trying out new ideas in your kitchen!