
Are you ready to make breakfast easier and more delicious? These Make-Ahead Chicken and Veggie Omelette Cups are perfect for busy mornings. Packed with protein and veggies, they provide a quick meal you can enjoy anytime. In this article, I’ll guide you step-by-step on how to whip up these yummy omelette cups. Let’s dive into the secrets of meal prep that will save you time and delight your taste buds!
Ingredients
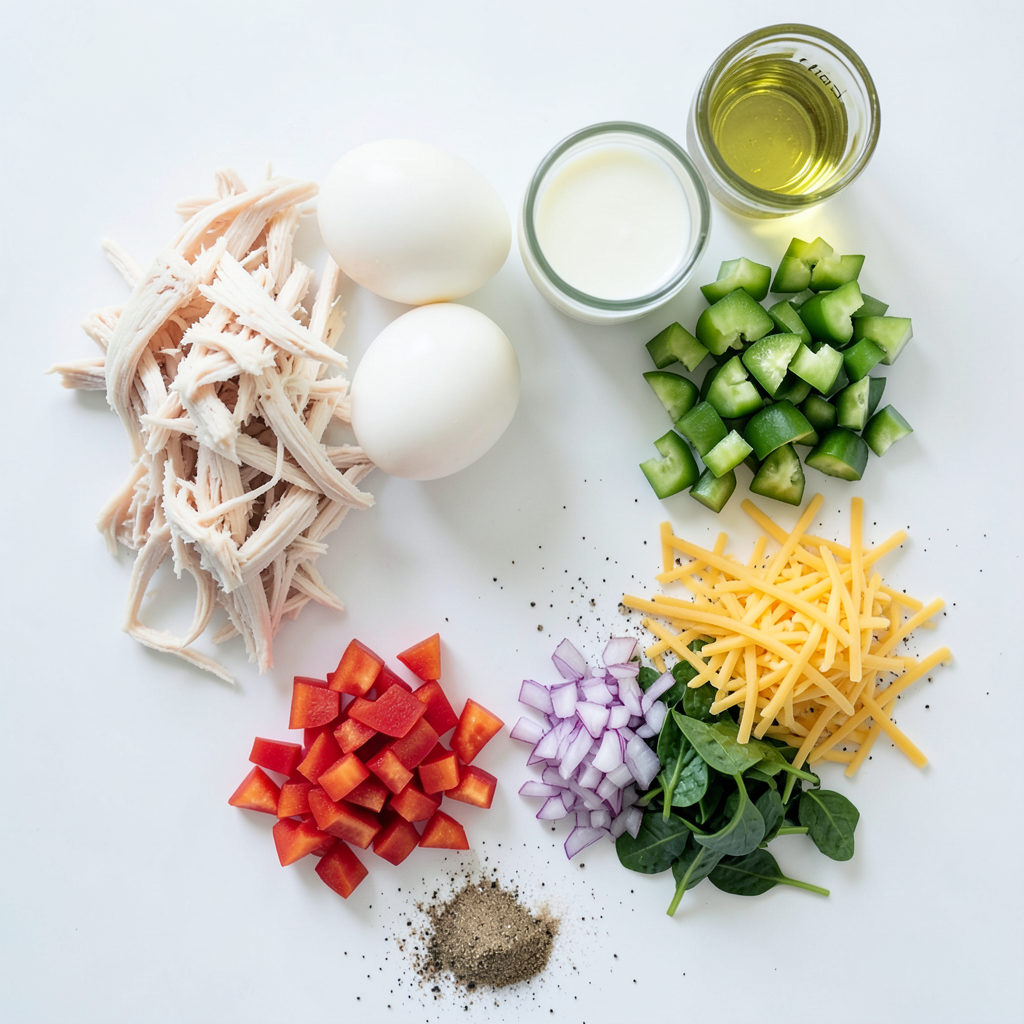
List of Ingredients for Make-Ahead Chicken and Veggie Omelette Cups
- 1 cup cooked chicken breast, shredded
- 6 large eggs
- 1/4 cup milk
- 1/2 cup bell peppers, diced (red and green)
- 1/2 cup spinach, chopped
- 1/4 cup red onion, finely chopped
- 1/2 cup cheese (cheddar or your choice), shredded
- Salt and pepper to taste
- 1 teaspoon garlic powder
- Olive oil or cooking spray for greasing
Importance of Fresh Ingredients
Fresh ingredients make a big difference in flavor and texture. They help your omelette cups taste bright and delicious. Fresh veggies add crunch, while fresh chicken keeps the dish juicy. I always recommend using the freshest eggs too. They will give your cups a rich taste and a lovely color. Using fresh ingredients also boosts your health. They are packed with vitamins and minerals that keep you strong.
Suggested Substitutes for Ingredients
If you don’t have chicken, you can use turkey or tofu. For the cheese, try feta or mozzarella for a different taste. Instead of bell peppers, zucchini or mushrooms work well too. If you want a dairy-free option, use almond milk or oat milk. You can even leave out the milk if you prefer. Each substitute can change the flavor, so feel free to play around!
Step-by-Step Instructions
Prepping the Oven and Muffin Tin
First, set your oven to 350°F (175°C). This step is key for cooking the omelette cups evenly. While the oven heats, take your muffin tin and coat it with olive oil or cooking spray. A good greasing helps the cups come out easily after baking. This makes for less mess and more fun when serving!
Mixing the Egg Base
In a large bowl, crack six large eggs. Add in 1/4 cup of milk. Whisk these together until they blend well. You want a nice yellow mix with no clumps. Now, season the mix with salt, pepper, and 1 teaspoon of garlic powder. This adds flavor to your omelette cups. Stir well so all the spices spread evenly throughout the egg mix.
Incorporating Chicken and Veggies
Now it’s time to add the fun stuff! Stir in 1 cup of shredded cooked chicken. Next, toss in 1/2 cup of diced bell peppers, 1/2 cup of chopped spinach, and 1/4 cup of finely chopped red onion. Finally, mix in 1/2 cup of your favorite shredded cheese. Make sure everything is well mixed. You want a tasty bite every time!
Baking the Omelette Cups
Carefully pour the egg and veggie mixture into the muffin tin. Fill each cup about 3/4 full to allow room for rising. Bake them in the preheated oven for 18 to 20 minutes. You’ll know they’re done when the tops are set and a little golden. After baking, let them cool for a few minutes in the tin. Use a spoon or spatula to gently remove the cups. Enjoy warm or store them for later!
Tips & Tricks
How to Achieve the Perfect Omelette Texture
To get the best omelette cups, start with fresh eggs. Use large eggs for the best rise. Whisk the eggs and milk well. This creates air bubbles. Air bubbles make the cups fluffy. Don’t overmix once you add the chicken and veggies. Stir just enough to combine everything. This keeps the texture light and nice.
Best Practices for Greasing the Muffin Tin
Greasing your muffin tin is very important. Use olive oil or cooking spray. Apply it in each cup. This helps the cups come out easily. If you skip this step, the cups might stick. Use a paper towel to spread the oil evenly. This ensures every part gets coated well. You want a smooth release when they are done baking.
Common Mistakes to Avoid
One common mistake is filling the cups too full. Fill them about 3/4 full for the best bake. If you fill them too much, they overflow. Another mistake is not checking the bake time. Keep an eye on them after 18 minutes. They should be slightly golden on top. Lastly, remember to let them cool before removing. This helps keep their shape.
Variations
Protein Options Beyond Chicken
You can swap chicken for other proteins. Turkey works well and is leaner. You can also use cooked sausage or ham. For a vegetarian option, try black beans or tofu. Each choice adds a new flavor and texture.
Vegetable Combinations for Different Flavors
Feel free to mix up the veggies in your omelette cups. Zucchini or mushrooms add a nice touch. Broccoli or kale can boost the nutrients. You can even use roasted veggies for extra depth. The key is to use what you love.
Cheese Variants to Customize
Cheese is a great way to add flavor. Cheddar is classic, but mozzarella brings a milder taste. Feta cheese adds a tangy twist. You can even try pepper jack for some spice. Choose your favorite to make these cups your own.
Storage Info
Recommended Storage Methods
After making your chicken and veggie omelette cups, let them cool. Place them in an airtight container. This keeps them fresh and tasty. You can also use plastic wrap to cover them tightly. Always store in the fridge if you plan to eat them soon.
How Long They Last in the Fridge
These omelette cups last up to five days in the fridge. Make sure to check for any signs of spoilage before eating. If they smell off or look different, it's best to throw them away. Keeping them at a steady fridge temperature helps maintain freshness.
Freezing Instructions for Longer Storage
To freeze, allow the omelette cups to cool completely. Then, place them in a single layer on a baking sheet. Freeze for about an hour until solid. Once frozen, transfer them to a freezer-safe bag. They can last up to three months in the freezer. When you're ready to eat, thaw them in the fridge overnight. Reheat in the oven or microwave before enjoying.
FAQs
Can I make these omelette cups without milk?
Yes, you can make these omelette cups without milk. Just skip it in the recipe. The eggs will still set well without milk. You can also use a milk substitute, like almond or soy milk. This keeps the texture light and fluffy.
How do I reheat the omelette cups?
To reheat the omelette cups, place them in the microwave. Heat each cup for about 30 seconds. Check if they are warm enough. You can also use an oven set to 350°F (175°C). Heat them for around 10 minutes. Cover them with foil to avoid burning.
Are these omelette cups suitable for meal prep?
Absolutely! These omelette cups are perfect for meal prep. You can make them ahead and store them in the fridge. They last up to five days in an airtight container. Just grab one for a quick breakfast or snack.
What dipping sauces pair well with omelette cups?
Several dipping sauces go well with omelette cups. Try salsa for a fresh kick. You can also use hot sauce if you like spice. Sour cream adds creaminess. For a twist, try avocado sauce or a yogurt-based dip.
You can easily make tasty chicken and veggie omelette cups at home. Start with fresh ingredients for the best taste. I shared step-by-step instructions for mixing and baking. My tips help you get the perfect texture and avoid common mistakes. Feel free to try different proteins, veggies, and cheeses for variety. Store them properly to enjoy later. These make-ahead omelette cups are great for meal prep and tasty anytime. Enjoy creating your perfect batch!